Do-it-yourself Christmas nail art

Updated On Dec 22, 2013 06:25 pm IST
1 / 6
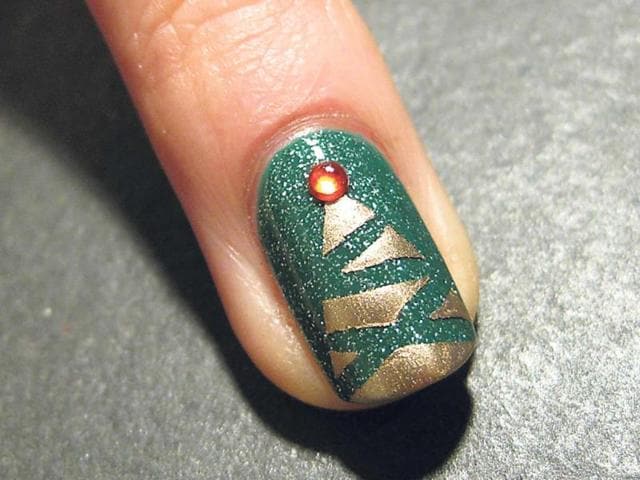
Pick your own christmas tree Get the good, old Christmas tree on your nails this season!You will need:Nail paints: Green, golden Adhesive tapeA pair of scissorsA red nail art stone Directions: Paint your nails golden. After the paint dries, take two strips of adhesive tape and stick them on your nails diagonally to form a triangle. Cut more thin strips of the tape and put them on your nails in a criss-cross pattern. Now, apply green nail paint and let it dry. Then, remove all the tapes. Stick the nail art stone and apply a top coat. expand-icon View Photos in a new improved layout
Updated on Dec 22, 2013 06:25 pm IST

Pick your own christmas tree Get the good, old Christmas tree on your nails this season!You will need:Nail paints: Green, golden Adhesive tapeA pair of scissorsA red nail art stone Directions: Paint your nails golden. After the paint dries, take two strips of adhesive tape and stick them on your nails diagonally to form a triangle. Cut more thin strips of the tape and put them on your nails in a criss-cross pattern. Now, apply green nail paint and let it dry. Then, remove all the tapes. Stick the nail art stone and apply a top coat.

2 / 6
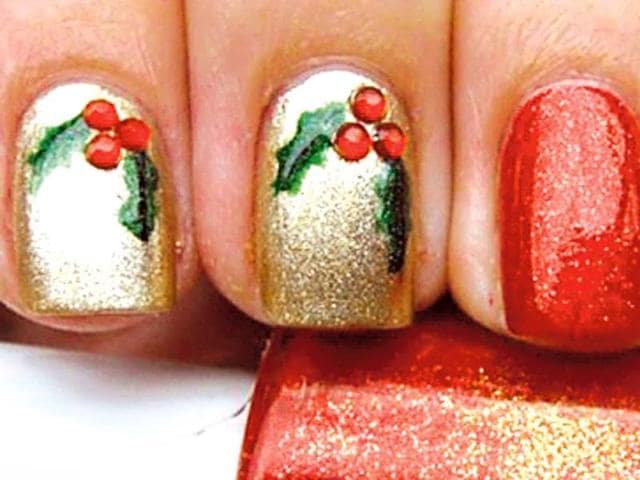
Deck the nails with hollyGet festive green with holly design.You will need:Nail paints: Red, Green, Golden Red nail art stonesA thin brushToothpickDirections: Apply golden nail paint on your nails. Stick the red nail art stones before the nail paint dries, to make sure they stay put. With the help of a thin brush, draw a‘V’ shape in green colour and scatter it using a toothpick to resemble holly leaves. Let it dry thoroughly. Apply top coat to secure the stones and give it a shine. expand-icon View Photos in a new improved layout
Updated on Dec 22, 2013 06:25 pm IST

Deck the nails with hollyGet festive green with holly design.You will need:Nail paints: Red, Green, Golden Red nail art stonesA thin brushToothpickDirections: Apply golden nail paint on your nails. Stick the red nail art stones before the nail paint dries, to make sure they stay put. With the help of a thin brush, draw a‘V’ shape in green colour and scatter it using a toothpick to resemble holly leaves. Let it dry thoroughly. Apply top coat to secure the stones and give it a shine.

3 / 6
Chill in style with Snowflake Feeling cold? Add snowflake to your nails this Christmas!You will need:Nail paint: White and RedWhite nail art penDirections: Apply red or any colour of your choice, on your nails, as a base colour. With the help of nail art pen make a ‘+’ sign. Add diagonal lines to it and then make inverted ‘V’ to the end of each line. Your snowflake is ready. Add tiny white dots to complete the look. Follow up with a top nail coat, once it dries. expand-icon View Photos in a new improved layout
Updated on Dec 22, 2013 06:25 pm IST

Chill in style with Snowflake Feeling cold? Add snowflake to your nails this Christmas!You will need:Nail paint: White and RedWhite nail art penDirections: Apply red or any colour of your choice, on your nails, as a base colour. With the help of nail art pen make a ‘+’ sign. Add diagonal lines to it and then make inverted ‘V’ to the end of each line. Your snowflake is ready. Add tiny white dots to complete the look. Follow up with a top nail coat, once it dries.

4 / 6
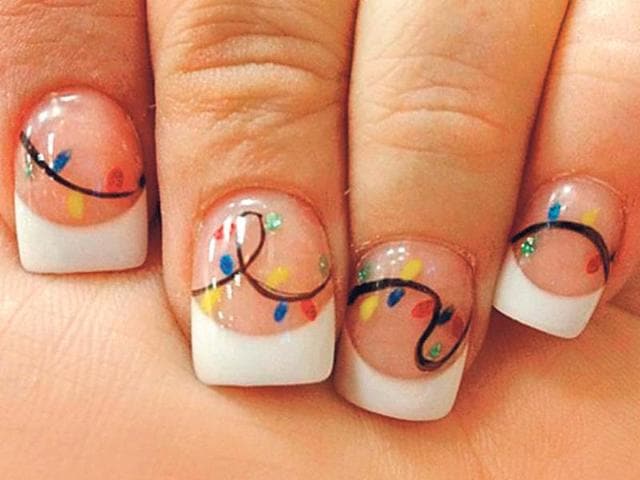
Glitter with Fairy Lights The entire city is lit up on Christmas. Make a shining style statement too.You will need:Nail paints: Black, yellow, blue, green, redThin brushToothpick Directions: Dip the brush in black nail paint and make irregular lines resembling wires on your nails. Make tiny dots hanging from it by dipping toothpick in nail paints. Apply top coat once it’s dry. expand-icon View Photos in a new improved layout
Updated on Dec 22, 2013 06:25 pm IST

Glitter with Fairy Lights The entire city is lit up on Christmas. Make a shining style statement too.You will need:Nail paints: Black, yellow, blue, green, redThin brushToothpick Directions: Dip the brush in black nail paint and make irregular lines resembling wires on your nails. Make tiny dots hanging from it by dipping toothpick in nail paints. Apply top coat once it’s dry.

5 / 6
Rock with a Reindeer Show off your creative side with cute reindeer nail art.You will need:Nail paints: Brown, white Black nail art penDirections: Apply white nail paint and let it dry. Paint a semicircle and then ears with the light brown nail colour (as in the picture). Draw the horns of the reindeer and the outline of the face, with a nail art pen. Dip a toothpick in white nail paint and draw its eyes. Use the nail art pen to make the reindeer’s nose. Use the toothpick to make the ‘Rudolph’ red nose, on one nail. Once it’s dry, apply top coat for shine. expand-icon View Photos in a new improved layout
Updated on Dec 22, 2013 06:25 pm IST

Rock with a Reindeer Show off your creative side with cute reindeer nail art.You will need:Nail paints: Brown, white Black nail art penDirections: Apply white nail paint and let it dry. Paint a semicircle and then ears with the light brown nail colour (as in the picture). Draw the horns of the reindeer and the outline of the face, with a nail art pen. Dip a toothpick in white nail paint and draw its eyes. Use the nail art pen to make the reindeer’s nose. Use the toothpick to make the ‘Rudolph’ red nose, on one nail. Once it’s dry, apply top coat for shine.

6 / 6
Stealing Santa’s cap It is time of the year for Santa to rock and roll on your nails!You will need:Nail paints: Red, black, whiteA thin brushBlack nail art penDirections: Apply the base coat on your nails. With a brush, paint a big inverted ‘L’. Randomly dab white balls near the curve and the tip of L, to make it look more like santa’s cap. Trace outline of the cap with a nail art pen, to define it. Apply a top coat to complete the look. expand-icon View Photos in a new improved layout
Updated on Dec 22, 2013 06:25 pm IST

Stealing Santa’s cap It is time of the year for Santa to rock and roll on your nails!You will need:Nail paints: Red, black, whiteA thin brushBlack nail art penDirections: Apply the base coat on your nails. With a brush, paint a big inverted ‘L’. Randomly dab white balls near the curve and the tip of L, to make it look more like santa’s cap. Trace outline of the cap with a nail art pen, to define it. Apply a top coat to complete the look.

SHARE
Story Saved
Saved Articles
Following
My Reads
Sign out
Get App
crown-icon
Subscribe Now!